Streaming Setup

Guy in a Cube performs live streams and here is the gear used to make that happen. To be clear, you don’t really need any of this to do a live stream, but it all helps to bring things together and give it that professional touch. A lot of time went into configuring everything.
Also – TEST, TEST and TEST again!!! We did probably around 10 test streams to work out the kinks. We hit a few technical bumps along the way but think we have it down pretty solid now.
You can download a PDF of the setup diagram here.
Stream Workstation Build
NOTE: The prices for the main computer parts were the prices paid at the time of purchase. Some were back in 2016 and are either a lot cheaper now, or not available.
| Item | |
|---|---|
| Case: NZXT Noctis 450 Mid Tower ($140) – A sleek case with built-in red LED. It gets the job done. Cable management, in the Noctis 450, was pretty good also. It allowed me to punch the cables through dedicated slots, so they didn’t get all bunched up above the motherboard. It also has space on the top of the case for a water cooling unit, along with ports for tubes. | |
| Power Supply: CORSAIR RMx Series RM850X 850W ($120) – This is probably overkill for the machine. Most machines run pretty power efficient. However, I thought it would be good to have the extra headroom to let the power curve be better. | |
| Motherboard: ASUS X99-PRO/USB 3.1 LGA 2011-v3 ($333) – USB 3.1, support m.2 drives, and has eight memory slots supporting a total of 128GB of RAM! It is a monster motherboard. | |
| CPU: Intel Core i7-6900K 20M Broadwell-E 8-Core 3.2 GHz LGA 2011-v3 ($1100) – Sporting eight physical cores and a 20MB L3 Cache this is a great processor. There are probably faster CPUs for dedicated gaming, but the primary purpose for this machine is video editing and rendering. I also thought getting a Broadwell chip will put me at the edge and a little more future proof as it is the latest. | |
| CPU Cooler: Noctua NH-U12S 120x120x25 ($60) – I thought about going water cooled, but I went with this instead to stay within budget. It is doing the job just fine. It also fits in the case just fine with room to spare. It only came with one fan. If I do see a problem with the CPU temperature, I can get another fan, or just upgrade to the water cooling solution. | |
| Thermal paste: Arctic Silver 5 ($7) – I’ve used this on every PC build I’ve done. The CPU fan came with thermal paste, but I’ve just always used this. It isn’t expensive. | |
| Memory: Ballistix Sport LT 64GB Kit ($250) – DDR4 2400 MT/s (PC4-19200). While the motherboard can support up to 128GB of RAM, I probably don’t need that. My laptop has 32GB of RAM, and I know I’m always bumping against that when rendering. Having 64GB seemed like the sweet spot. | |
| Harddrive #1: Samsung 950 PRO Series – 512GB PCIe NVMe – M.2 Internal SSD ($318) – This is my OS/Boot drive. It was a little tricky getting this to work right, but once I did, it is wonderful! This is a fast hard drive. There are tons of articles that talk about how this is the future of SSD. Drives plugging directly into the PCI bus removing the bottlenecks. I followed this video to get it going without disappearing on me. | |
| Hard drive #2: Samsung 850 EVO – 1TB SSD ($307) – This is my main data drive. Most of my work will be on this drive. It is big enough to hold my current work items and small enough not to be super expensive. | |
| Graphics Card: MSI Gaming GeForce RTX 2070 Super 8GB ($506) – You need a good video card to help with the video encoding. I went towards to upper end. It doesn’t flinch at all. | |
 |
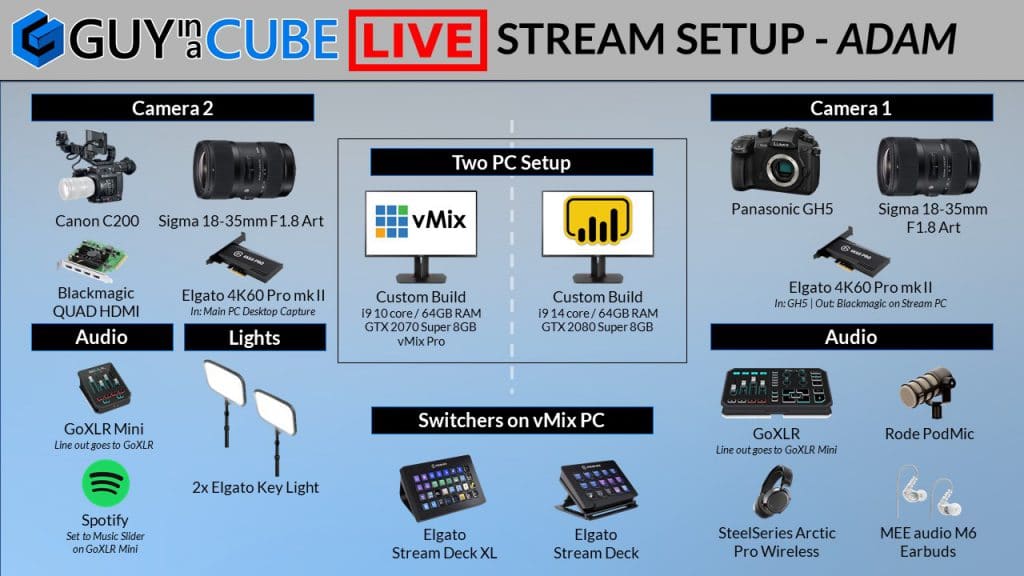
Capture Card #1: Elgato 4K60 mk.2 Capture Card ($239) – I have an HDMI cable going from the video card in my main machine into this capture card on the Streaming machine. This is capturing my main machine desktop at 2k resolution. |
 |
Capture Card #2: Blackmagic Design DeckLink Quad HDMI Recorder ($545) – HDMI cable coming from the out port of the 4k60 capture card on the main PC into the blackmagic card. This is my Panasonic GH5 video feed. I have 3 more ports to add more cameras later. |
| Monitor #1: LG Electronics WQHD IPS Curved 34-Inch LED-Lit Monitor (34UC97-S) – Not available anymore. Picked up a few of these back in 2015. I found that I had issues with getting the capture cards to work right at the full resolution of the monitor. Had to manually set it to a 2K resolution to work right. | |
| Monitor #2: LG 27UK850-W 27″ 4K UHD ($450) – This is used as a confidence monitor and is connected to the streaming PC. |
Other gear used for streaming
Here is more gear used for streaming. Again, you don’t need this. It helps to make a professional stream though. You can always build up to it.
I got a lot of inspiration from watching Alpha Gaming, EposVox and Live Streaming Pros on YouTube.
| Item | |
|---|---|
| GoXLR ($499) – Audio mixer connected to my main PC. This is the master control. It is also linked to the GoXLR mini to have complete control over stream audio. This is seriously a must have device for streamers. | |
 |
GoXLR Mini ($249) – Scaled down version of the GoXLR. This is connected to the streaming PC. It is also connected back into the main GoXLR device to have complete control over the stream sound. If you can’t afford the GoXLR, look at getting this little guy. Great device! |
 |
Elgato Key Light ($200) – Two of these are mounted on the desk. The lights are controlled with the Elgato Stream Deck connected to the streaming PC. |
 |
Elgato Stream Deck ($121) – Two of these are used. One connected to main PC and the second connected to the streaming PC. Great way to automate items with macros and have things at a touch of the button. |
 |
Elgato Stream Deck XL ($245) – This had a lot more keys on it. This is connected to the stream PC and controls vMix functionality. From stream/rec buttons, to scene transitions and controlling lower thirds. This is the workhorse of the stream next to vMix. |
 |
SteelSeries Arctis Pro Wireless Gaming Headset ($307) – Got these because they have a base that can be plugged into the GoXLR headphone jack even though the headphones are wireless. Great headphones! And, the battery lasts a while. |
 |
RODE PodMic Dynamic Microphone ($99) – Great little microphone. This uses an XLR jack that is plugged directly into the GoXLR. Combined with the GoXLR, it does a great job for the stream. |
 |
RODE PSA 1 Swivel Mount Studio Microphone Boom Arm ($120) – Great arm for the PodMic. Had a Blue Yeti on it before the PodMic. This arm is attached to one of the arms of the desktop mount system shown below. |
 |
Webcam: Logitech C922x Pro Stream Webcam ($75) – Secondary web cam. Not really used yet. May play with it more. |
Streaming Camera
| Item | |
|---|---|
 |
Camera: Panasonic GH5 ($1300) – Great camera! This is also Adam’s travel camera when he is out and about. It has a full HTML out that is connected to the 4K60 on the main PC. It also allows for clean HDMI out. It is outputting 4k resolution at 60fps. |
 |
Lens Adapter: Metabones T Speed Booster Ultra 0.71x Adapter ($673) – The GH5 camera is Micro 4/3. It also has a cropped sensor. This adapter lets you mount full EF Canon lenses, gives you an extra f-stop and provides a full frame sensor look. |
| Lens: Sigma 18-35mm f/1.8 for Canon ($600) – This is a great lens. I have two of them. One for the GH5 and one for the C200. It is a bit pricey but well worth it. The lens probably does more for the video than the camera does. This is my main video lens that is used for the majority of videos you see on Guy in a Cube. The GH4/5 camera/lens combo I got, at the time I bought it, was considered possibly one of the best combos to get. Check out this video. With the adapter, I can get f/1.2 – that’s the blury background for you! | |
| Power: Panasonic DMW-AC10 Ac Adapter ($123) & Panasonic DMW-DCC12 DC Coupler ($40). Allows for the camera to always be plugged in and on. |
Desk mount setup
Adam uses a Monitor desk mount with a few arms to hold the main monitor, streaming camera and microphone. This was based on a video from the DSLR Video Shooters YouTube channel. Made some small modifications.
| Items | |
|---|---|
 |
WALI Extra Tall Single LCD Monitor Fully Adjustable Desk Mount ($45) – This is the main mount item. Everything connects to it. Of note, it comes with an arm. I didn’t think about that when I bought the other 2 arms, but they are being used. |
 |
WALI Single Fully Adjustable Arm ($22) – additional arms. Picked up two of these. |
 |
PULUZ Metal Handheld Adjustable 3/8″ Size Tripod Mount Monopod ($11) – Monopod used to raise the camera up a bit. Adjust where it needs to be. |
 |
Pergear TH3 Pro DSLR Camera Tripod Ball Head ($22.50) – Ball head to put camera on. |
 |
NICERYIG 3/8 Inch and 1/4 Inch Camera Quick Release Screw Tripod Screw ($10) – Used to screw the monopod into the WALI arm. Of note, I had to enlarge the hole to get the screw to fit. I used a step drill bit to do it. This was the only physical modification that was needed to make. |
Software and Services
This is the software and services we use to make the stream happen.
| Items | |
|---|---|
| vMix – Production streaming software. Both Adam and Patrick run vMix and they are connected to each other for outstanding signal quality. | |
 |
Streamelements – Used for certain overlays and member/superchat events. The URLs for the overlays are pulled into vMix. |
| Epidemic Sound – Licensed music used for streams and regular videos. Have been using Epidemic Sound for years now and happy with the song choice. |