There are 3 gateway settings that I find helps people with getting the On-Premises Data Gateway up and running in their enterprise environment. Issues will come up when companies restrict their network with tools such as firewalls or proxies. These 3 gateway settings will help you to successfully set up and use the on-premises data gateway.
This can help you with Power BI, PowerApps, Microsoft Flow or Logic Apps.
Gateway settings
There are a number of settings available for the gateway, but this post is going to focus on three specific settings. These three are picked from a few common problems that people contact me with. One or more settings typically help to get the gateway running in these enterprise environments.
Let’s dig into what these settings are!
1. Whitelist the Azure IP range
This setting doesn’t have anything to do with the gateway directly. This is more about the firewall configuration for your environment. If your organization has restricted access to the internet by way of their firewall, they may need to open up some items to let the gateway communicate.
The gateway communicates with the Azure Service Bus and will do this by talking to IP addresses used by Azure Service Bus. These are part of the Azure IP range. You would need to whitelist these IPs to allow communication to be successful.
You can download the Azure IP range list from the Microsoft Download Center. This list is updated weekly. You will need to monitor the list and make appropriate changes.
2. Force HTTPS for communication with Azure Service Bus
Consider this scenario. You have a web proxy in your environment that only lets you communicate on port 80 or 443. As mentioned above, the gateway communicates with Azure Service Bus which is typically on a different port range other than 443.
This has to do with ports. All communication is encrypted and not exposed over the wire.
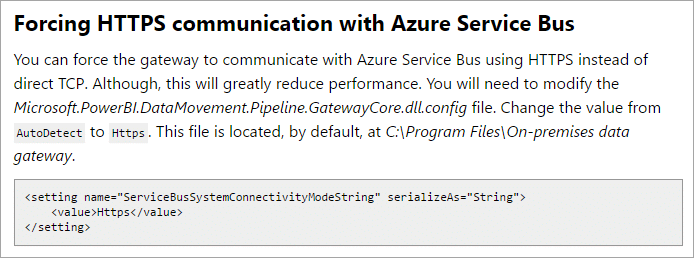
You can change the configuration of the gateway only to use HTTPS communication. This will force communication over 443 and allow it to work with the web proxy.
You will want to change the ServiceBusSystemConnectivityModeString from AutoDetect to Https.

On-Premises Data Gateway (official documentation) – https://powerbi.microsoft.com/en-us/documentation/powerbi-gateway-onprem/#ports
Remember to restart the gateway windows service after making this change for it to take effect.
3. Change the service account
Let’s stick with the web proxy scenario. We made the change to let it communicate to Azure Service Bus on HTTPS (443). Our web proxy also requires that you authenticate with a valid domain user. It won’t let anything through if it doesn’t know who you are!
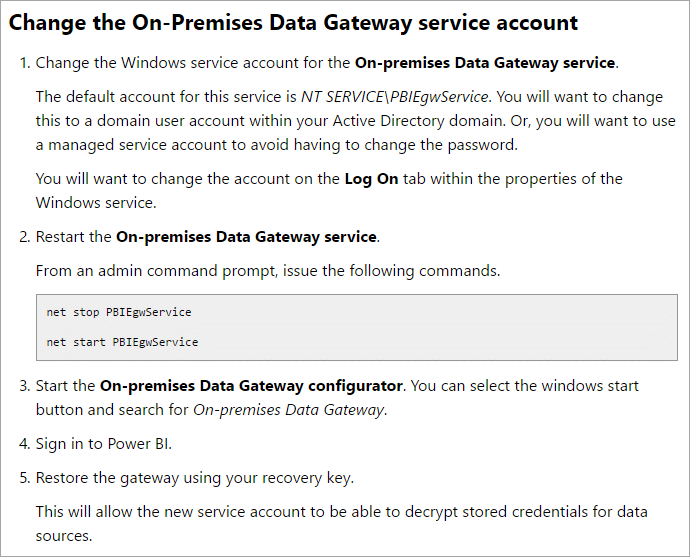
By default, the gateway uses the Service SID for the log on as account. This is NT SERVICE\PBIEgwService. This is not a local user or a domain user. You can change the account to a domain user to allow it to authenticate properly.

Configuring proxy settings for the On-premises Data Gateway (official documentation) https://powerbi.microsoft.com/en-us/documentation/powerbi-gateway-proxy/
Once you have changed the account over to a domain user communication should start to work properly in most cases.
Will this fix all issues?
Will this fix everything? No. Your environment may be configured in a different way than these settings will help. It may be that you need to whitelist the IPs and alter the .NET config files for the gateway to use a specific account or to point to a specific gateway machine. It could be that it is something I’m not aware of.
That being said, the settings I’ve listed have fixed a majority of issues and I felt it is worth sharing.